Creating 3D text in AutoCAD is a quite not
known task for many beginners, and creating a text on a non-flat surface can be
even trickier.
We will see in this post how you can have a
word written on a circular shape of a cylinder and having theirs shape to
completely match the curvy surface.

AutoCAD 3D tips for beginners
Step 1
Assuming your cylinder has already been
created since that is considered here like an AutoCAD basics task we won’t go
through it.
Create a text.
1.
Type MTEXT and Press ENTER
2.
Specify the first corner
3.
Specify the opposite corner
4.
Type your text
5.
And click somewhere else in the
drawing window
Step 2
At this point, we have a text and a
cylinder already created.
1.
Click on the Express Tools tab
2.
Select text
3.
Click on Modify Text
4.
And click on Explode

Step 3
Extrude the text

Step 4
1.
Type UNION
and Press ENTER
2.
Select the whole and Press ENTER

Step 5
Place the text where it has to be on the
cylinder and make sure it completely overlap with the cylinder


Step 6
Have a copy of the whole on the site.
On one copy, apply the INTERSECTION command
to extract the intersecting geometry resulting from both. And on the other,
apply the SUBTRACT command; subtract the text from the cylinder.
You should end up with the following.

Step 7
Move the text and drop it exactly where
where you have gaps in the cylinder to match the subtracted geometry.

Step 8
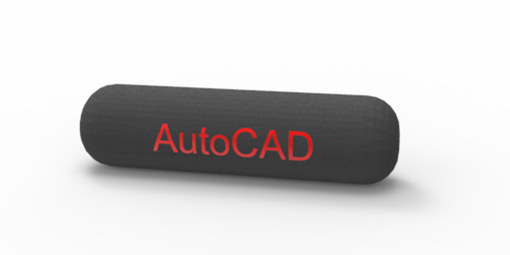
Apply different materials to these objects
to make the text more visible and here we go.
Feel free to ask any question for more
clarity if in any case you happen not to understand a part of this AutoCAD tutorial.
No comments:
Post a Comment